Spider mites are one of the fastest-reproducing pests in an indoor grow. A single female can lay up to 200 eggs in her lifetime, and under warm, dry conditions those eggs hatch in as few as three days. By the time most growers notice the spider mite damage, populations are already well established.
This guide covers how to identify spider mites on weed, the most effective way to eliminate them using beneficial insects, and when to reach for a spray-based option like Grower's Ally Spider Mite Control.
We also cover what to do if you're deep into flower, where most treatments become off-limits.
What Are Spider Mites?
Spider mites (Tetranychus urticae, the two-spotted spider mite, is the species you're most likely dealing with) are not insects. They're arachnids, related to spiders and ticks, which is why most insecticides have limited effectiveness against them. They feed by piercing leaf cells and extracting the juice, leaving behind the stippling pattern that's usually the first sign of an infestation.

Two-spotted spider mites are extremely small, typically 0.4 to 0.5mm as adults. They're visible to the naked eye as tiny moving dots on the undersides of leaves, but a magnifying loupe makes identification much easier. Look for creatures with two dark spots on either side of their translucent yellowish-green body.

What Causes Spider Mites on Plants?
Spider mites don't generate spontaneously. They arrive on plants after being carried in. Common entry points include:
- Clones from another grower or dispensary. The most common source. Always inspect incoming plant material under magnification before it enters your space.
- Reused soil or containers. Eggs can survive in growing media between runs. Sterilize containers before reuse.
- Outdoor exposure. Handling plants outside or bringing equipment in from a garden lets mites hitchhike in.
- Hot, dry conditions. These don't cause spider mites, but they accelerate an existing population faster than most growers expect. Stressed plants are also less able to resist feeding damage.
How to Identify Spider Mites on Plants
Here's what to look for when you crack open the grow tent with your loupe:
Stippling on upper leaf surfaces
Tiny yellow or white dots scattered across leaf tops where mites have punctured cells to feed. A heavily infested leaf looks pale, almost silvery, and will eventually yellow and drop.
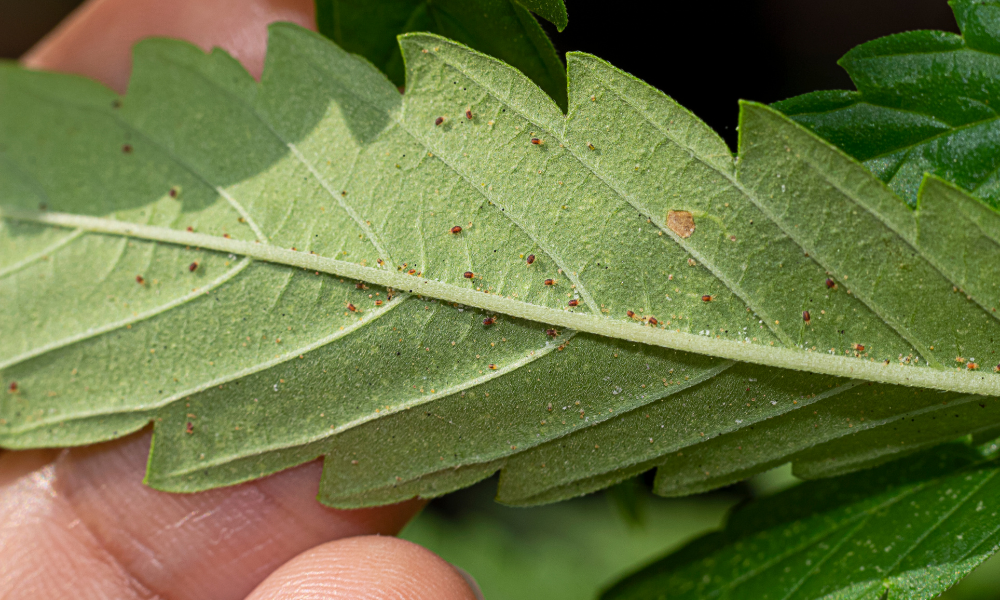
Mites on the undersides of leaves
Two-spotted mites congregate on leaf undersides to feed and lay eggs. Adults move slowly. Breathe gently on a suspect leaf and they'll start moving. Eggs are round, smooth, and translucent white.
Webbing between leaves and stems
Fine silk webbing appears as populations grow. Early webbing is sparse and easy to miss. Heavy infestations create dense webbing across entire branches, usually the stage growers notice first.
General plant decline
Yellowing from the tips or margins, loss of vigor, slow growth. Spider mite damage is frequently misread as a calcium or magnesium deficiency. If your CalMag fix isn't working, check under the leaves.
 Spider Mite Damage by Growth Stage
| Stage | What You'll See | Urgency |
|---|---|---|
| Seedlings & clones | Rapid decline, leaf cupping, failure to thrive. Young plants have almost no capacity to absorb water through a mite-damaged leaf surface. A small population can stall or kill a seedling in days. | Critical |
| Vegetative | Stippling first on lower and middle leaves, progressing upward. Leaves yellow and drop. Growth slows. Often looks like a magnesium deficiency when it isn't. | High |
| Flowering | Reduced resin production, thinner-than-expected buds, webbing that traps debris and creates botrytis conditions. Treatment options narrow significantly once dense buds are forming. | High |
Best Treatments for Spider Mites
There are two solid approaches, and which one you reach for depends on your situation. If you're running a biological control program with predatory mites, that's your primary tool: residue-free, no spray required, works through flower without affecting bud quality. If you don't have beneficials deployed, or you're dealing with a grow where spraying is simpler, Grower's Ally Spider Mite Control is a strong spray-based option, OMRI-listed, formulated with rosemary, clove, and peppermint oils, and safe all the way to harvest day. The key is choosing one approach per grow: Grower's Ally and similar sprays will kill beneficial insects, so don't spray while predatory mites are active.


Neoseiulus californicus or Amblyseius andersoni: Prevention and Early Infestations
Both are generalist predatory mites that feed on spider mites across all life stages, including eggs. They establish in the plant canopy, lay their own eggs, and maintain a resident population as long as prey is available. They also survive on pollen when mite pressure is low, so they stay in your space and keep hunting even between pressure events. Sachets continuously release mites over 4 to 5 weeks, providing extended protection without repeated manual applications.
| Application | Rate | Timing | Notes |
|---|---|---|---|
| Bulk preventive | 20–50 ft² per unit | Every 2 weeks to young plants until canopy closes | Use alongside sachets if mite pressure is high |
| Sachets | 1 per 2 plants (1 per plant if pressure is high) | Hang as soon as damage is noticed; replace every 4–5 weeks | Hang towards the middle of the plants |
Phytoseiulus persimilis: Active Infestations
P. persimilis feeds exclusively on two-spotted spider mites and is a fast, aggressive hunter that can consume 5 to 7 per day. Unlike generalist predatory mites, it cannot survive without spider mites as prey, which makes it a targeted intervention tool rather than a long-term resident. When released into a hotspot it will exhaust the prey population and die off, at which point you transition back to CALIforce or AMBLYforce A for ongoing prevention.
| Application | Rate | Timing | Notes |
|---|---|---|---|
| Active infestation | 2–5 ft² per unit | Apply weekly in and around hotspots until controlled | Transition to CALIforce or AMBLYforce A for prevention after |
Prevention vs. Outbreak: A Practical Playbook
Prevention Mode
Start at the beginning of every grow cycle, ideally when plants are transplanted into their final containers and foliage begins to fill in.
- Apply CALIforce or AMBLYforce A bulk every two weeks to young plants until the canopy closes
- Hang CALIforce or AMBLYforce A sachets as soon as foliage is large enough to support them; replace every 4 to 5 weeks
- Place yellow sticky traps above the canopy to monitor adult mites and track population trends
- Keep humidity between 50 to 70% RH and temperatures below 80°F to slow any mite population that establishes
Outbreak Control
If you're finding mites on leaf undersides or seeing webbing, escalate immediately. Spider mite populations can double every 3 to 5 days under warm conditions.
- Apply PERSIMILISforce at 2 to 5 ft² per unit, in and around all identified hotspots
- Upgrade to 1 sachet per plant rather than 1 per 2 plants if CALIforce or AMBLYforce A is already deployed
- Continue weekly PERSIMILISforce applications until mite populations are no longer found, then transition back to sachets for prevention
- Reduce temperature and increase humidity slightly to slow mite reproduction while predators establish
- Monitor with sticky traps. A downward trend in catches over 2 weeks confirms the program is working
How to Get Rid of Spider Mites During Flowering
Flowering is when spider mite control gets complicated. Dense bud structure makes it harder for sprays to reach mite colonies on leaf undersides, and most spray-based treatments carry real risks to bud quality.
Here's what is safe to use during and after flower:
- Beneficial mites. The predatory mite program described above is the cleanest approach during flower. Predatory mites don't require spraying, don't leave residue, and can operate inside the canopy without direct bud contact.
- Grower's Ally Spider Mite Control. An OMRI-listed foliar spray formulated with rosemary, clove, and peppermint oils. No heavy oils, no alcohols, no pollutants. Safe through vegetative and flowering stages all the way to harvest day. The right choice for growers not running a predatory mite program. Do not spray while beneficial insects are active in your grow, as it will harm them.
- Isopropyl alcohol for emergency spot treatment. A 50/50 mix of isopropyl alcohol and water, applied directly to mite colonies on individual leaves, kills on contact and evaporates quickly. Safe on foliage during flowering if kept off buds. This is not a population control strategy.
- Bud washing at harvest. A dilute hydrogen peroxide wash followed by a clean water rinse removes mites, webbing, and debris without affecting the final product. Useful as a last step if mites are present at harvest, but not a substitute for controlling the infestation during the grow.

Quick Reference: Spider Mite Response Checklist
Prevention (every grow)
- Deploy CALIforce or AMBLYforce A sachets at transplant
- Apply bulk mites every 2 weeks until canopy closes
- Set yellow sticky traps above the canopy
- Keep temps below 80°F and RH above 50%
- Quarantine and inspect all incoming clones
Active infestation (with beneficials)
- Apply PERSIMILISforce weekly to hotspots
- Upgrade to 1 sachet per plant (from 1 per 2)
- Vacuum heavy webbing before treating
- Reduce temp, raise humidity slightly
- Watch sticky trap counts. Downward trend over 2 weeks = working
Active infestation (no beneficials)
- Spray Grower's Ally Spider Mite Control, safe through flower
- Apply every 3 to 5 days until mites are controlled
- Do not introduce predatory mites while spraying
 Other Preventive Measures
Quarantine all incoming plant material
Clones are the most common source of spider mite introductions. Keep a dedicated quarantine area and treat incoming plants with predatory mites before they go into the main grow.
Control temperature and humidity
Keeping your tent below 80°F and above 50% RH doesn't eliminate risk, but it significantly slows any population that establishes.

Keep the grow area clean
Remove fallen leaves promptly. Dead plant material and debris on the floor can harbor mites and eggs between runs.
Vacuum heavy webbing before treating
If webbing is extensive when you find an infestation, vacuuming it off before applying any treatment reduces the population and removes the physical barrier that webbing creates against predators reaching mites directly.
Avoid over-stressing plants
Plants under heat, drought, or nutrient stress are less able to resist feeding damage and often show mite damage symptoms before populations are large enough to see. A stable environment is pest management too.
Frequently Asked Questions
Questions? We're easy to reach.
Happy Hydro has been serving growers since 2006. Call or email us before you order, after you order, or any time something comes up. When you're happy, we're happy.